Showing posts with label chicken. Show all posts

Tuesday, May 12, 2009

How to juice a chicken...

Mmmm. Chicken juice. Alright, all kidding aside, see all this?


That's almost a gallon of chicken stock. It's pretty concentrated, as you can tell by the color. Do you have any idea how much a gallon of organic chicken stock costs in the store? An absolutely ridiculous amount, considering that it's essentially made from scraps. Make no mistake, though, this is liquid gold to a serious home cook. It livens up pasta sauce, rice and tons of other grains. Risotto cannot exist without chicken stock -- and risotto is astoundingly cheap to make if you know make your own stock. Risotto, trust me, is on my agenda to show you.

Ready to make chicken stock?
Here's what you need:

A deep stock pot
your leftover chicken frame (picked over bones), cleaned of all stuffing
2 onions
3 small carrots
3 celery stalks
2 bay leaves
water
I also like to throw in thyme as it is crawling all over my yard, but this is non-essential.

Instructions: Throw everything in the pot (removing peel from onions to keep the bitter away), cover with cold water (a gallon and a half, approx.), bring to a boil, turn down heat, simmer for several hours or until you have to leave the house or go to sleep or something. That's it. Really. You don't even have to chop anything up small. I cut the onion into 1/8's and break the carrots and celery up with my hands. And you thought this would be hard.

Set a colander over a deep container and pour the stock through the colander. Toss out your solids. You are done with them. Do not, as I did groggily one morning, pour half of your stock down the sink reserving the solids before you realize what you are doing. Oh, you think, who would be stupid enough to do that? Just you wait.

Cool stock down as quickly as possible by setting it in a sink full of ice (this keeps it from staying at a dangerous temperature for too long and breeding harmful bacteria). After cooling, put into containers and freeze what you won't use right away -- don't forget to label with the name and date!

So, to be clear, this is essentially what got me started on the roasting whole chickens thing in the first place. It is so nice to have cheap food for a week and, as an extra bonus, have nearly free chicken stock on hand all of the time. Plus, I promise that you will feel like a bit of a culinary bad ass once you start making and storing all of your own stocks -- and that is worth plenty in its own right.

Lazy girl's supper...

Most evenings, you likely stumble home tired and the last thing on your mind is cooking, especially when it's hot. Say, for example, you also have a half picked-over chicken lurking in your refrigerator because some writer convinced you that you would get a million uses out of it. What's for dinner? This:
A nice bed of lettuce, some chopped tomato and some chopped avocado make a great summertime meal -- especially for a girl like me who tends to eat more than three meals a day. Add some dressing, serve with good bread and you're done. You could add some cheese if you wanted to. I like my salads kind of spartan, however. If anything, though, I'm trying to teach you to be loose and use whatever's available, so just go for it.
I'm going to throw out a few more ideas for the roasted chicken, tell you how to make a stock and then leave the yard bird alone for a little while. I think that you get the picture. HOWEVER, should you have any requests for recipes or need to find yet another use for chicken, please do not hesitate to ask. I will indeed take requests, especially if you bribe me.
Chicken ideas:
Chicken tacos with rice and salsa
Chicken pasta with pesto and tomatoes
Chicken salad sandwiches
Chicken Caesar salad
There, so I've given you at least five different ways to use up your bird. Be creative -- it's how you learn. Plus, if you learn to stretch your food with cheap ingredients, it can go far. Think, for example, about adding plenty of celery, grapes and onions to your chicken salad. After about a week, pull the rest of your chicken if you haven't used it off of the bones, pack it into a Ziploc, label it with a sharpie (include the date) and stick it in the freezer. Now you have chicken for future chicken salad. This may seem obvious, but most people that I know do not use their freezers enough. Learning how to not throw away food is a big step toward saving money and -- get this -- freezers are more efficient when full.
By the way -- the bones are not trash! Next I'll tell you how to make stock.

Friday, May 8, 2009

Chicken chicken chicken, I'm a finger-lickin' winner


So, now that you have this giant bird that you've brined and roasted (if you have no idea what I'm talking about, check the archives for brining and roasting), what do you do with it?


The legs make great individual meals with a simple starch and veg. The picture at the top of this post is a chicken leg that I simply ripped off the bird with my hands 30 minutes after it came out of the oven (sounds kind of primal, doesn't it?) accompanied with some bacon Brussels sprouts and brown rice. Think you don't like Brussels sprouts? Try this recipe:

This is what you need: 1 onion, 2 garlic cloves, a sprig of fresh thyme, 3 thick pieces of bacon, a good chunk of butter and, of course, some Brussels sprouts. I'm not very keen on exact measurements unless I'm baking, hence the pictures. You'll need salt and pepper and cooking oil, too.

Get a pot of salted water boiling (about 1 1/2 T of salt should do) Meanwhile, chop the very bottoms off of the Brussels sprouts, then slice them in half. Once you've done this, throw them in your boiling water and blanch them just until they turn bright green. Have a bowl of iced water waiting for your sprouts. Once they turn bright green, drain the sprouts, then toss them into the iced water to make sure that you shock them into not cooking any further.


Now, chop your garlic, thyme, then start cutting your onion. Slice the top off, leaving the root intact. Then place it sliced side down, and cut the onion in half through the root. Pull the peel off, then slice each half fairly thinly, say 1/4 inch, keeping each slice about the same thickness. Next, chop the bacon into little pieces.

Heat 2 pans on medium heat. Throw the bacon in one, a little oil in the other. Heat the oil for a second, then add the onions. The bacon will render its own fat, so it doesn't need any extra lube. Let the onions cook for a bit, stirring them once in a while so that they don't burn. Cooking them slowly will caramelize the sugars. You want to cook the onions until it they are a nice, nutty brown. If things start to burn a bit, turn down the heat -- all stoves are different.


Almost done here, still need to get a bit darker.


The bacon needs to be stirred around, too. Once it gets close to crispy, pull it off the heat. It will continue to cook a bit in its own fat -- don't discard the fat, that's the good part! When both onions and bacon are done, combine and set aside.

Next, heat the butter up over medium-high heat in a heavy, large pan that is big enough to accommodate the Brussels. Let the butter get nice and brown without burning it -- brown butter tastes nutty and extra yummy. Then throw in your Brussels and the garlic. You don't have to stir them too much. In fact, letting them brown brings out a nice, toasty flavor.


Then add your onion and bacon mixture to your sprouts, along with the thyme. Let cook together for a bit, and salt and pepper to taste.


Yum.


Tuesday, May 5, 2009

Now to cook the bird...roasting your chicken

So, by now your bird should have been brining for a good many hours. If not, start with the recipe for brining in one of the previous posts. I've tagged everything on this blog, so all recipes should be easy to search for. Drain your bird (ie, pour the whole mess, brine and bird, into a colander and let the brine run down the drain. The brine has served its purpose. Make sure you bleach out your sink after draining). The next step is trussing. Luckily all of the birds that I buy from my local whole foods market are pre-trussed like this guy over here. That saves a ton of time, and I think trussing is just messy -- I always feel like I'm flinging around raw chicken, which is something that you don't want to do. By the way folks, make sure to wash your hands often when you mess with a raw bird. Need to learn how to truss a chicken? let this guy tell you: http://www.expertvillage.com/video/16486_chicken-truss.htm
The reason you want to truss a chicken is to pull everything tight into a little package so that it cooks more evenly. Once you've got your bird bundled, set it in a roasting pan and make your rub. This is what I like in my rub:

black pepper, thyme, lemon zest, garlic salt, smoked paprika

Once again, whatever floats your boat as far as flavor goes. Think about what you like to eat with chicken and go for it. It's hard to screw up.


First, pre-heat your oven to 400 degrees.
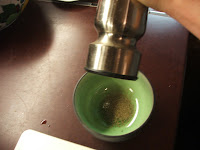
Ok, so if you are going with my rub, grind some pepper into a bowl, just a couple of tablespoons.


Next, zest a lemon into the bowl. Hopefully you have a microplane. If not, go get one. They rock for grating hard cheeses, citrus, chocolate, whatever. Set the lemon aside -- you're going to stuff it in your bird with some onion or garlic, or whatever juicy ingredients you have sitting around that go with poultry, like celery, carrots, apples, etc.


Add a tablespoon of smoked paprika. If you find this difficult to source, join the club. I order mine online, but you will probably be able to find some in your local specialty store. Regular paprika is just fine, I just like the smokiness -- it kind of gives the chicken a rotisserie flavor.


Add some chopped fresh herbs if you have them. If you don't go grab some pots, some starts and some soil and get on it! I have thyme all over my yard. It's a great, hardy and drought-tolerant ground cover.


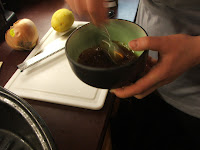
Add some olive oil, I'd say about 1/2 a cup.


Stir to make a paste.


For the stuffing that's going to fill up your bird and give it flavor, cut a lemon into quarters, then also quarter half an onion. That's likely all that you will need. If you still have room after you stuff that into your chicken cavity, you can always add some garlic cloves.


Throw that all together in a bowl, then add a couple of spoonfuls of your paste and mix. Skip this step if you don't feel like doing it. It's almost just a ritual for me.

Now stuff the chicken!


Place the chicken breast up in the pan.
Now rub the chicken with the paste that you made. Don't forget to keep washing your hands and be careful of cross-contamination! I like to sprinkle the garlic salt over the top of the bird last.


Ready to go...
I'm a cheat. My oven has its own meat probe that plugs into a sensor the oven wall. I set it so that the heat stops when the thermometer says that the chicken is 170 degrees by the thigh bone. You can easily check the temp of your bird as it cooks with any meat thermometer. I am easily distracted and can justify the extra expenditure for the digital probe in the lack of burnt food. At any rate, 170 is the lowest temperature that most cookbooks recommend that you cook chicken. I think that 170 is a perfect temperature for moist meat, even though you might spy a tiny bit of pink near the bones, which is nothing to worry about. Go up to 175-180 if you like your bird a bit dryer around the breast, the dark meat falling off the bone. My big bird took a little over an hour to get to where I thought it was perfect. Again, make sure that you stick your thermometer in the thickest part of the thigh, right down near the bone. The Joy of Cooking says to figure 1 hour for the first 4 pounds, an extra 8 minutes for each additional pound. If your bird weighs less than four pounds, make sure to check it earlier.

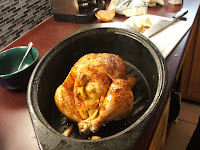
The finished product! Let it rest so that all of the juice doesn't run out when you slice into it...about 20 minutes.


Monday, May 4, 2009

Down to business...brining your chicken

Want to make a delicious, tender, juicy bird with a perfect, crispy skin? Of course you do! I've gone over the economic benefits of buying whole foods...it just makes sense if you have the time. Think you don't have the time? You do. I swear you can find it if you try.

So, see this fat bird right here?


That big boy, locally raised, free range and all that good stuff only cost me $7.41. For that we'll end up with 2 legs, 2 wings, enough breast meat for several meals, then the leftover pickings for making chicken salad or pasta or whatever. Oh, don't forget about the gallon of homemade chicken stock you can make to have on hand for risotto, pasta sauce, couscous, whatever. The sky's the limit. The trick is not to get sick of chicken, but then that part's up to you. At least you're eating.

Moving on.

What you want to do first, to ensure that your bird is nice and juicy, is brine it for as long as you can stand it. I like a good 24-hour saltwater bath, but if you start your bird early in the day it potentially could be ready to cook for dinner. The longer it brines, the more flavor it soaks up and the more tender the flesh becomes. It's up to you. I pop mine in the brine as soon as I bring it home from the store.
Here's how to do it yourself.
You need:
salt
peppercorns
garlic
soy sauce
That's it. Super easy. First, plunk your bird in a deep pot and cover it with cold water.

I'm sure you know how to do that without a picture, but I just wanted to give you a little something to look at. To the pot, add some salt, about a cup if it's table salt, a cup and a half if it's Kosher. I never measure, just throw it in there.

Add some peppercorns. You can even skip this if you want. Sometimes I throw a little juniper berry in there, or some herbs, whatever has flavor. Again, up to you. Add some soy -- I just pour until the water changes color, maybe 3/4 of a cup. Then chop the garlic in half, throw it in the pot. See how easy it is? Five, ten minutes, tops.


Then throw it in the fridge for a few hours (like 24). I posted a picture of my refrigerator contents because some people (like me) are kind of voyeuristic about that sort of thing:

So, you may notice that some recipes call for boiling the brine first and then cooling it down, I guess to help impart more flavor from whatever you're putting in the brine. I think this is just a waste of time. Believe it or not, I don't exactly live in my kitchen -- or have any desire to. Next I'll show you how to cook the thing. Go out and get your bird! Oh, and a meat thermometer if you don't already have one.